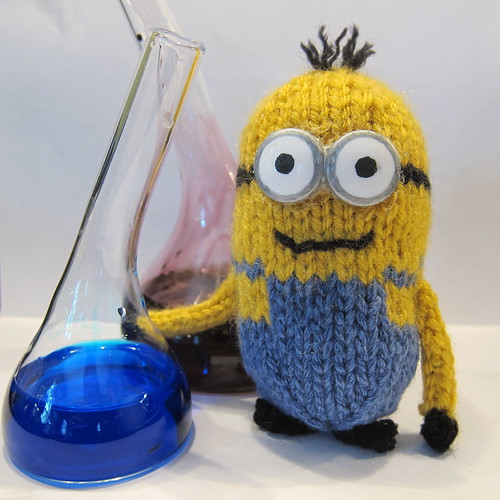
I realized the minions are the same shape as my Pocket-Sized Robot so it was easy to get the basic body down. The overalls required a little intarsia in the round (though you can do duplicate stitch if you wish). The trickiest part was really the goggles. I knew embroidering them on wouldn't give them the 3D goggle effect. I thought about using wiggly eyes & just painting a little silver around the edges but I couldn't find the right size. Then I thought of buttons. I found flat white buttons with a shank on the back that would work just right. Building up the back of the buttons with glue after attaching them gives them stability & more of the goggle shape. Its a little tricky but I like the result. If you come about with another option I'd love to see it.
Here are the skills needed to make your minion:
Knitting in the round
Intarsia in the round or duplicate stitch
Decreasing & Increasing
Basic embroidery & sewing
I-cord
Your Own Personal Minion
I used Aran weight yarn to make my minion on size 5 needles. My gauge was about 5 stitches per inch. My minion is about 4 inches tall & 6 inches around. You can use any size yarn & needles you want just make sure you are getting a tight knit so the stuffing doesn't show through. The bigger the yarn & needles the bigger the minion & vice versa.
I've included links in this pattern for how-tos on some of the techniques. Click any of the pictures to see them bigger.
Supplies:
Yarn of choice in yellow, denim blue & black (you need just the littlest bit of each)
Four double pointed needles of the appropriate size
tapestry needle
Two 3/4-inch flat white buttons with shanks (or buttons appropriate sized to your minion)


Make 2 shoes.
In black cast of 3 stitches & knit an i-cord. Work for 3 rows.
Cut yarn leaving about an 4-inch tail. Thread tail onto a tapestry needle & thread through the 3 stitches on the needles. Pull tight & weave in the end. Use the cast on tail to sew on.
Copyright 2010 Kathy Lewinski.
Please do not sell my pattern, claim it as your own or teach it in a store without contacting me. You may link to it from your blog or site.
I am not a professional pattern writer & am sharing this with you for free so if you find any problems with this pattern please let me know but please be kind.
Supplies:
Yarn of choice in yellow, denim blue & black (you need just the littlest bit of each)
Four double pointed needles of the appropriate size
tapestry needle
Two 3/4-inch flat white buttons with shanks (or buttons appropriate sized to your minion)
black & silver acrylic paint
thick tacky craft glue
poly-fil stuffing
poly-fil stuffing
Abbreviations:
Kfb – Knit into the front & back of the same stitch, increasing one stitch
Ssk – Slip the first two stitches off the left needle onto the right needle as if to knot. Insert the left needle into the front of these two stitches & knit them together (left slanted decrease)
K2tog – knit two together (right slanted decrease)
Body:
Cast on 6 stitches in yellow. Divide equally on 3 needles. Join together being careful not to twist. Place a marker between your first & last stitch to mark rows.
Row 1: kfb into each stitch (12 stitches)
Row 2: k
Row 3: kfb, k1, kfb, k1, kfb, kfb, k1, kfb, k1, kfb, k2 (18 stitches)
Row 4: k
Row 5: kfb, k2, kfb, k2, kfb, k2, kfb, k2, kfb, k2, kfb, k2 (24 stitches)
Row 6: k
Row 7: kfb, k3, kfb, k3, kfb, k4, kfb, k3, kfb, k3, kfb, k2 (30 stitches)
Row 8 - 17: k (to make a taller minion just add more rows here)
Pull your cast on tail inside & weave it in. Now is the time to add the goggles, mouth & hair.
Hair:
Where you started knitting is the head of your minion. Pull pieces of black yarn through the top, leaving a little showing for the hair, & knot them to your knitting on the inside. Arrange them around the top in any hairstyle you want. Trim them to be an even length if desired. I like to put a dab of craft glue on each knot for extra security.
Goggles:
Paint around the edge of each button with silver. Then paint a black eyeball in the center. Decided where you want the goggles to be on the minion, you want them to touch each other, mark it. (I choose the area right in the (kfb, k4, k2tog) section of the head.) Then duplicate stitch a band of black around the minion centered on where the goggles will be for the strap. Sew on the dry goggles. I then used a good thick craft glue to attach the goggles to each other in the center & also fill in behind each button to give it the depth of the goggles. I found the tip of a needle or toothpick made a good delivery system for the glue. Make sure to use a glue that dries clear. When the glue is dry you can also paint it silver.
Mouth:
Using black yarn embroider on a mouth.
Stuff the minion as much as you can at this point. Then keep stuffing as you go along.
Overalls:
You can either do the bibs & straps of the overalls in intarsia or duplicate stitch.
Rows 18- 22: follow the chart below if you are doing intarsia. If you are doing duplicate stitch just knit the rows in yellow & then follow this chart for the duplicate stitch later. The shaded squares are the blue & the white squares are yellow. Click on the chart to enlarge it & save it to your computer.

Change to just blue
Rows 23 - 27: knit
(If you are duplicate stitching the overalls this would be a good time to do that.)
Row 28: ssk, k3, ssk, k3, ssk, k4, k2tog, k3, k2tog, k3, k2tog, k2 (24 stitches)
Row 29: k
Row 30: ssk, k2, ssk, k2, ssk, k2, k2tog, k2, k2tog, k2, k2tog, k2 (18 stitches)
Row 31: k
Row 32: ssk, k1, ssk, k1, ssk, k2tog, k1, k2tog, k1, k2tog, k2 (12 stitches)
Row 33: k
Row 34: ssk, ssk, ssk, k2tog, k2tog, k2tog (6 stitches)
Add any additional stuffing you need. Cut yarn leaving about an 8-inch tail. Thread tail onto a tapestry needle & thread through the 6 stitches on the needles. Pull tight & weave in the end.
Arms:
Make 2 arms
Cast on 3 stitches & knit an i-cord. (Here are instructions on knitting an i-cord.) Work 8 rows. (If you have made your minion taller increase the arm the same number of rows. Minions arms should be as longer or longer than their bodies.)
Now, you will increase & decrease to create the hand. You are still knitting an i-cord while doing this. Switch to black yarn
On the next row kfb into each stitch giving you 6 stitches. Knit the next row. Next row K2tog three times giving you 3 stitches.
Cut yarn leaving about an 4-inch tail. Thread tail onto a tapestry needle & thread through the 3 stitches on the needles. Pull tight & weave in the end. Use the cast on tail to sew on.
Shoes:
Make 2 shoes.
In black cast of 3 stitches & knit an i-cord. Work for 3 rows.
Cut yarn leaving about an 4-inch tail. Thread tail onto a tapestry needle & thread through the 3 stitches on the needles. Pull tight & weave in the end. Use the cast on tail to sew on.
Use your minion to help you plan for world domination.
Copyright 2010 Kathy Lewinski.
Please do not sell my pattern, claim it as your own or teach it in a store without contacting me. You may link to it from your blog or site.
I am not a professional pattern writer & am sharing this with you for free so if you find any problems with this pattern please let me know but please be kind.
Handmade 365 2010- My goal is to spend time everyday working on something handmade for a year & photograph it.
If you are not reading this post in a feed reader or at http://kat-knits.blogspot.com then the site you are reading is illegally publishing copyrighted material. Contact me at katbaro AT yahoo DOT COM. All patterns, text and photographs in this post are the original creations & property of the author unless otherwise noted.© 2007-2010 Kathy Lewinski
LOVE LOVE LOVE!
ReplyDelete......aww
ReplyDeletethis is showing in movie now here, my girl loves them all .thanks.
I am so glad you posted your pattern, I've been dreaming about my own minions ever since I saw yours! Thank you!!
ReplyDeleteI must have my own minion!!! I need him badly for my office. ;-)
ReplyDeleteGreat pattern and thanks so much for sharin!
Great pattern. Thank you so much for sharing this!
ReplyDeleteThanks for sharing!
ReplyDeleteI love your minion! Would you mind if I did a post about this on my blog with a link to yours. You would get total credit!!!
ReplyDeleteThreads of Inspiration - You can totally do a post on it, just don't reprint the pattern link people to my site to come & get it. Thanks!
ReplyDeleteKat, Thanks, I will definitely just put up the link, but also a photo of the cute little guy. I believe I will put it up today. It is so adorable! Sadly, I don't knit that well, but it is so great I must share it!
ReplyDeleteHowdy,
ReplyDeleteI've just finished knitting my own little Minion and blogged about it here: http://aleximo.tumblr.com/post/871937675/i-made-a-minion-yesterday-from-this-lovely
Thanks so much for posting, your instructions were really clear and easy to follow. *^_^*
Alex
xXx
Yay! I saw a link to this post on the Craftzine blog this morning. I love that they gave you a shout out.
ReplyDeleteAre there any patterns out there for the short, squat minions?
ReplyDeleteI love this and am trying to have my sister knit me one!
THANK YOU! I'm so happy with my minion! and I hope he's happy with me. I'm a novice knitter, so your site is a huge help.
ReplyDeleteAdorable!~ I am making minions for a gift, and devised a pattern, but was haing trouble with the eyes, love your solution!!
ReplyDeleteLove the knitted minions. I can't read a chart too well. Can you write up like a pattern? It would be easier for me.
ReplyDeleteThanks so much! My parents saw the pattern when I was looking at what other things you had (I maded the Grumpasaurus for my baby brother) and they both wanted me to make each of them one!
ReplyDeleteAbsolutely adorable!
ReplyDelete